


If you don't know what meta tags are, and the importance of adding meta tags, here is the detailed article on how to add them to your blogger(blogspot) blogs or any website.
Adding meta tags is very important if you want to get some good traffic from search engines like google,yahoo,msn,etc,especially the meta description part is the most important one.
If you don't know what meta tags are,Meta tags are the tags which describes your site and tells the search engines what your site is all about. Adding meta tags is an important factor in Organic Search Engine Optimization (SEO). Meta tags allows search engines to index your web pages more accurately. In other words,Meta tags communicate with the search engines and tells more information about your site and make your webpages index correctly and accurately.
Use BitPixels to display websites in thumbnail

Thank you for your intereast in our service
Use the link below to get images. Just replace someurl.com with the site you want to get the thumbnail for:
For example, to display an image of cnn.com on your site, add this in your HTML page:
Then add the following attribution somewhere on pages on which you display our thumbnails. This is all we ask for in return for providing this service for free.
You can also add a 'size' parameter to change the size of the thumbnail. Allowed sizes are 100, 120, and 200 (numbers refer to width in pixels). If omitted, size 100 is assumed.
Add a favicon to your blog
Adding a favicon to the blogger(blogspot) blog:
For those who don't know what Favicon is 'Favicon is a small icon(image) displayed at the beginning of the address bar of the browser.It is also called Favourite Icon,Pageicon and urlicon.
The main advantage of creating and using favicon is ,it makes it easy to find your blog or site when someone favourited or bookmarked your site/blog among several other sites.
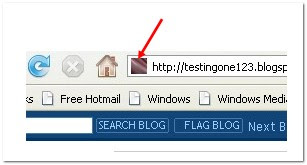 Most of the people use 16*16 pixel favicon(you can also use 32*32 pixel favicon) with ".ico" format.But,you can also use gif,png(image formats) aswell.
So,ready to create a favicon?
Updated:
I created a Free Favicon generator tool which will save lot of your time. Just go to this page and upload any image file (JPG or GIF or PNG or BTM) and it will automatically convert it to icon file and you can save it to your desktop.
Next, you need to upload it to some host. There are lot of free hosts available to host .ico files and with hotlinking enabled.. Just do a quick google search.
Once you upload it to some host. you get a direct url to the favicon file..
Ex:
For those who don't know what Favicon is 'Favicon is a small icon(image) displayed at the beginning of the address bar of the browser.It is also called Favourite Icon,Pageicon and urlicon.
The main advantage of creating and using favicon is ,it makes it easy to find your blog or site when someone favourited or bookmarked your site/blog among several other sites.
Most of the people use 16*16 pixel favicon(you can also use 32*32 pixel favicon) with ".ico" format.But,you can also use gif,png(image formats) aswell.So,ready to create a favicon?
Updated:
I created a Free Favicon generator tool which will save lot of your time. Just go to this page and upload any image file (JPG or GIF or PNG or BTM) and it will automatically convert it to icon file and you can save it to your desktop.
Next, you need to upload it to some host. There are lot of free hosts available to host .ico files and with hotlinking enabled.. Just do a quick google search.
Once you upload it to some host. you get a direct url to the favicon file..
Ex:
http://howshealth.com/favicons/bt.icoHow to create a clickable slide show
 How to create a clickable slide show
The slideshow we've just created is almost identical to the one in the beginning of this tutorial, except that its not clickable. We will now see how to extend this example to enable it to not only be "hyperlinked", but hyperlinked with a different url, depending on the image displayed.

A slideshow that's not clickable is essentially the same as a fancy animated gif. A slideshow that is, however, becomes an interactive billboard. In this section, we will enhance the old slideshow to make it into just that!
Don't panic- the road to interactivity does not require us to alter the original code in anyway. All that's needed is the addition of a <a> tag surrounding the <img> tag, and a function that manipulates this <a> tag to match different links to each image in the slideshow.
Step 1: Surround the existing <img> tag with a <a> tag. Use a JavaScript url in place of a standard url to allow programmatic access to it:
<a href="javascript:slidelink()"><img src="firstcar.gif" name="slide" width="100" height="56" /></a>
Notice the code
javascript:slidelink()The above is called a JavaScript url, and when clicked on, will call and execute a JavaScript function, instead of load a document. By throwing out the standard link and replacing it with a JavaScript url, a url turns dynamic.
How to add slideshow to your blog
Adding Slideshow to your blog can be a fun way to draw visitors or to promote your art or photography for a business blog. Here's how to add one to your site. Note that as of today, Jan. 15, 2008, there are still bugs in the Slideshow program; but read on for some suggestions for overcoming those bugs. They're easy and work like a charm.
- Difficulty:
- Moderate
Instructions
Things You'll Need
- Computer and Internet Access
- Photos in Photobucket
- 1 Log on to your Photobucket album.
- 2 Create a "subalbum" (if you haven't already) by uploading photos that you'd like for your Slideshow. Note-- do not choose the "create a Slideshow" option in Photobucket.
- 3 Keep your Photobucket page open for later use.
- 4 Log on to Blogger in another window.
- 5 Go to "Dashboard."
- 6 Click "Layout."
- 7 Click "Add gadget."
- 8 Click "Slideshow."
- 9 Title your Slideshow and then choose "other." Keep this window open.
- 10 Go back to Photobucket and at the bottom of your "subalbum" in the left hand corner it will say "public feed" and "album feed." You want to right click on "album feed" to open it in a new window. If you click on "public feed" it will create a Slideshow of all of your Photobucket images.
- 11 Copy that URL.
- 12 Go back to blogger and paste that "subalbum" feed address into the box that says "feed."
- 13 Preview the Slideshow.
- 14 Save changes. You're done.
- 1
How To Managing DNS Records
Managing DNS Records
Custom DNS records can be useful when you want to use third-party services for certain functions or to provide enhanced functionality to your site using your domain.For instance, you can use Google Apps Standard Edition for e-mail and other functions for your site.
MX Records
MX Records are used to route your e-mail through your domain and tell it what machine is handling your e-mail.You should only have the MX records of one service provider on your domain at any given time or you may encounter issues with mail being routed to multiple locations at random.
Deleting Existing MX Records
- Login to your website control panel
- Click on MX Records
- Click Delete next to each record you wish to remove
Adding MX Records
- Login to your website control panel
- Click on MX Records
- Select the domain on the left via the dropdown menu (eg. example.org)
- Enter the MX record on the right (eg. mxrecord.example.net) as detailed to you by your provider
- Enter the Priority of the record (eg. 10) as detailed by your provider
- Click Add
- Repeat steps 3-6 as needed for each MX record
CNAME Records
CNAME records are records used to associate a new record (eg. mail.example.org) with an existing record (eg. ghs.google.com) this makes it so you anytime ghs.google.com changes its records, you do not have to change your records too.Adding CNAME Records
WWWizer solves naked domain problem.
Naked domain redirect.Visitors of example.com get redirected to www.example.com Address bar switches to www.example.com | Naked domain proxy.Visitors of example.com see content from www.example.com Address bar shows example.com |
 |  |
Just point your naked domain to 174.129.25.170 | $5 US per month per domain 5 Gb of traffic included. |
No sign up necessary. No credit card required. No need to leave your email. | Sign up |
This is free. That's when your website doesn't work without www in front | 30 days money-back guarantee. |
Subscribe to:
Posts (Atom)
Popular Posts
-
Someone had asked Kang Rohman about how to hide Older Post or Newer Post in blogger, and Kang Rohman had answered the question by posting...
-
 The 'powered by blogger' attribution at the bottom of the page looks really annoying on blogger/blogspot. If you want to give your...
 -
 How do I remove the Powered by Blogger from my Blogger blog? In order to remove you will need to edit the blogger template and delete the ...
 -
BitPixels Thank you for your intereast in our service Use the link below to get images. Just replace someurl.com with the site you want to...
-
Congratulations! You've made it to the 1st step of creating a website. It is highly recommended that you read this ENTIRE ...
-
How to remove home link bottom on blogger – My tracking tool noted a lot of visitors enter to this blog using remove home link bottom blogg...
-
Blogger offers two free publishing options for your blog: hosting on BlogSpot (example.blogspot.com) and hosting on your own custom domain...
-
Google AdSense is a blog monetization method. Google AdSense is an advertising program for blogge...
-
Here sharing the customization tip to remove the blue banner of blogger (blogspot) and the default favicon from your blogspot blog. This w...
-
Facebook is a great Social Networking Site to promote your blog or brand. Most of the major brands do have a Facebook Fan Page. Here are s...


Follow us
Subscribe to

